Production
Production Models & Methods
Field Production
Adam and Laura combine a bed system with succession planting for their field production. Bed planting allows for more intensive production than standard rows and also provides flexibility for growing a diverse variety of crops with different spacing needs. While rows are more efficient at a larger scale, such as at Gardens of Eagan, the bed system works well for the smaller scale of Loon Organics (Figure 23).
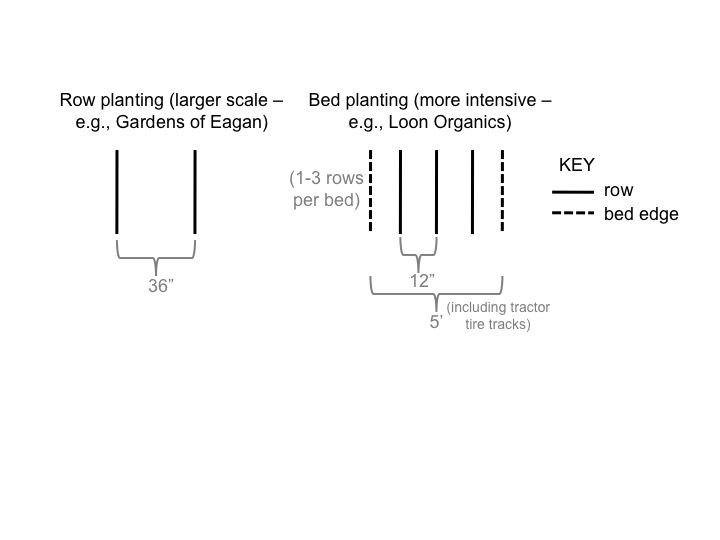
Figure 23: The production system at Loon Organics is based on beds that are 4' wide (or 5', including the tractor tires), allowing for more intensive farming than the standard row spacing used at Gardens of Eagan.
One of the keys to commercial production, whether in beds or rows, is matching row spacing to equipment for more efficient planting, cultivating, fertilizing, and harvesting. Laura and Adam have invested in tractor attachments that maintain consistent 12-inch spacing during seeding (Figure 24) and weeding (Figure 25). The number of rows per bed varies by crop. Beets are an example of Adam and Laura’s standard system of three rows per bed; beet production is described further in relation to Table 4 and under Crop Yields. Other crops, such as summer squash and certain greens, are planted in two rows per bed, using the outer two rows in each bed to attain a 24-inch spacing that works with the tractor implements. |
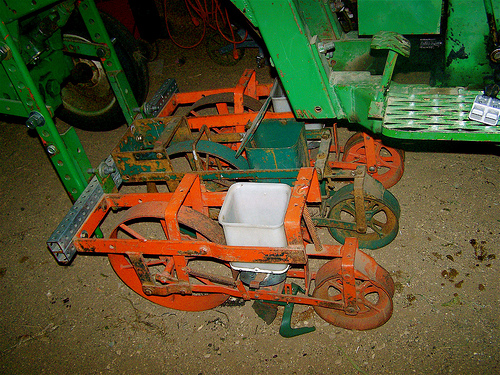
Figure 24: This Planet Jr. seeder provides consistent spacing for crops that are sown directly into the ground. 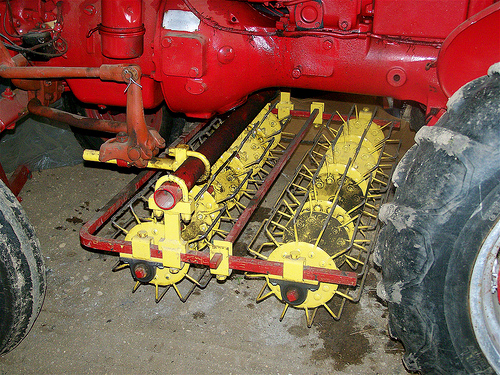 Figure 25: This basket weeder maintains the same spacing as the seeder during cultivation for weeds. |
Tomatoes, watermelons, and cucumbers are unique in that they are planted in one (the central) row per bed. These heat-loving crops need good ventilation to prevent fungal disease; they also benefit from the use of plastic mulch, which heats up the soil earlier and minimizes soil splashing (and hence soil-borne pathogen transmission). Adam and Laura space the rows for the heat-loving crops at 10 feet to allow tractor passage for cultivation between rows.
| Figure 26: Peppers, such as these Jimmy Nardello's Italian Sweet Frying Peppers (an heirloom variety and one of Laura and Adam's favorites), require a relatively long period to mature and so must be planted during a relatively short window. | 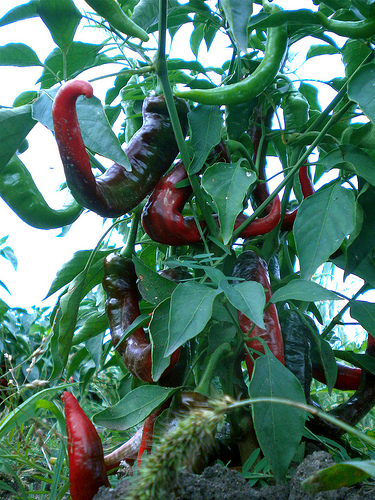 |
Succession planting is critical to a CSA operation because it maximizes the period over which crops ripen and can be harvested, thereby providing customers with continuous product. Each crop has a different schedule of succession planting. There are two key factors that generally dictate the planting schedule.
1) Days to Maturity: For crops with a relatively short time between seeding (or transplanting) and harvest (i.e., 30-70 days) plus short harvest windows – such as salad greens, chard, cucumbers, summer squash, beets, beans, broccoli, cabbage, and cauliflower – Adam and Laura plant every 1-3 weeks to have a consistent supply throughout the season. Crops with longer maturity times (e.g., tomatoes, melons, eggplant, peppers, winter squash, onions) are planted in one or two large plantings in order to take advantage of the short harvest window that occurs in their USDA Plant Hardiness Zone. Longer-day crops must be in the ground by mid-June in order to mature in time (Figure 26). Although Adam and Laura are still learning about their farm’s microclimate, the relatively flat topography means they have no major frost pockets to deal with. They do use south-facing or south-sloping fields for earlier plantings and reserve other fields for crops that can tolerate some shade or other directional aspects.
2) Cold Tolerance vs. Frost Sensitivity: Because Adam and Laura plant a combination of cold-tolerant crops (e.g., broccoli, beets) and frost-sensitive crops (e.g., cucumbers, winter squash, melons), they must integrate the frequency of planting with the appropriate planting windows when planning production. Broccoli, for example, is transplanted successively every two weeks from May through July for harvest from early summer to late fall. Similarly, beets are one of the first crops planted in April or May, as soon as the ground can be worked. Beets are then planted every 2-3 weeks until late July. At Adam and Laura’s location, frost-sensitive crops cannot be planted outside until late May, when the danger of frost has passed. Cucumbers are transplanted outside in late May and then planted every 3 weeks until mid-July for a continuous harvest. For crops with longer maturity times (i.e., 80-120 days), such as winter squash or watermelons, there are one or two large plantings in late May and early June to ensure that the plants have adequate time to mature before a fall killing frost.
Although Adam and Laura spend considerable time and effort scheduling their plantings, they inevitably have to make adjustments due to weather. They often plant earlier or later than planned once the season is underway. If germination of their first sowing of beets was delayed by a week, for example, and they were to do the second seeding a week after the first as originally scheduled, they would have both plantings come in at once and be overwhelmed with product.
Laura and Adam often plant different cultivars of the same crop together at the same time in order to achieve diversity in maturation dates and a diversity of plant characteristics, such as disease resistance. They select varieties that are best suited to production in certain seasons according to the yield quantities and the harvest windows they are targeting for each crop. Varietal selection, the bed system, and succession planting get integrated into a set of production details for each crop.
The sheer number of crops grown at Loon Organics makes it impossible to describe all the details of production here. Beet production from 2009 is summarized in Table 4 as an example of how the “when” and the “where” of the system come together for one crop (Figure 27). In the case of beets, four varieties were planted in four fields between April 28 and August 5, resulting in an almost continual harvest throughout the season. The table also shows how fertility, weed pressure, and irrigation are managed; these aspects of production are discussed further under Sustainable Practices, while the “audit trail” needed for organic certification is discussed at more length under
Farm Management/Operations.
Loon Organics’ 2009 tomato crop is described below as another example of how the bed system and succession planting are integrated; it also illustrates how their standard bed system is adapted for certain crops and how they integrate field and hoop house production.

Figure 27: Green-top beets provide a useful example throughout the case study because they illustrate Loon Organics' standard bed system and the use of succession planting to achieve product throughout the season. Laura and Adam also have continuous production data on beets because they have grown them consistently since start-up.
| At A Glance: Tomato Production Laura and Adam seeded 24 tomato varieties in the greenhouse in 2009: 2 hoop house, 1 rootstock, 4 cherry, 1 heirloom cherry, 10 heirloom, 1 paste, and 5 slicer. They seeded two rounds about three weeks apart in early and late April, using open soil flats. Most varieties were started in groups of 25-50 seeds, with a few favorites seeded in quantities up to 250. They used heat mats for fast and even germination and achieved germination rates of near 100%. Seedlings were repotted in open flats (50 per flat) approximately 3 weeks after seeding date. Five varieties were destined for transplanting in the hoop house in early June, while the remainder went to Field #2 (see Figure 48). Most field-transplanted varieties were in the ground by the third week in May, with the rest in by early June. In the tomato beds, Adam and Laura use 10 feet for between-row spacing (to fit their mower) and 2-3’ for within-row spacing. Field tomatoes are trellised using the Florida basket-weave technique. Hoop house tomatoes are pruned to a single “leader” stem, and the stem is secured to twine with tomato trellis clips. Field #2 had not been used by the previous landowners. Laura and Adam plowed the field in mid-April and used the field digger and drag to work out the oats and first flushes of weeds that covered the field and to break up soil clods. (Normally they would plow a new field the year before planting to allow a rest period due to their heavier soil, but the schedule was compressed the first season on their new farm.) In late May, they added a 3” x 3” application of composted cow manure as well as an application of Sustane 4-6-4 (at 25 lb per 300 row-feet) in the row centers just before transplanting the tomatoes They placed drip irrigation tape in the individual beds, covered the beds with a green plastic mulch approved for use by the Organic Materials Review Institute, and began transplanting (one row per bed as mentioned above) (Figure 28). Adam and Laura used drip irrigation for Field #2 at planting times and again in mid-June and early July. The 2009 season was drier than normal until early August. Their soil type and some cooler than normal temperatures helped mitigate the drought to a certain degree. They cultivated weeds on June 20 and seeded a cover crop between tomato rows in early July. They chose Italian ryegrass as the cover crop and broadcast it at 50 lbs/acre. Germination of the rye was relatively low at 75% due to the drought, but it grew enough to be mowed twice between planting time and August. The field tomatoes suffered from septoria leaf spot after early August rains (Figure 29). Although this fungal disease doesn’t damage the fruit, the leaf damage leads to plant defoliation which in turn causes late-season tomatoes to be sun scalded. The disease cut short their harvest of saleable tomatoes by about two weeks, during the second half of September. |
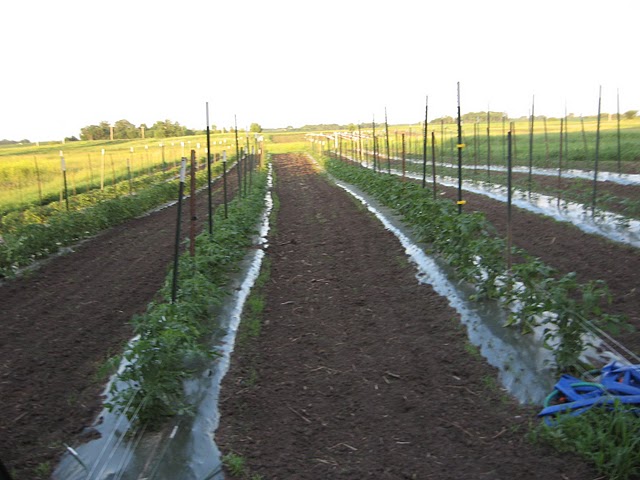 Figure 28: Tomatoes are planted on plastic mulch with 10' between rows. |
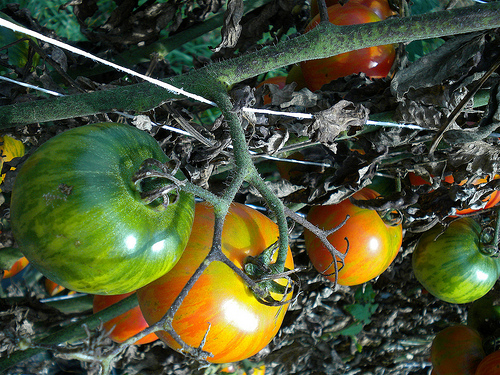 Figure 29: Tomatoes are exposed to sun scald when the plants are defoliated |